FACIAL RECOGNITION
ENTRY GUIDE
日本語ガイドはこちら
At concerts using mobile tickets
(face recognition),
All visitors must register Face photo to MOALA account linked to your TOBE ID.
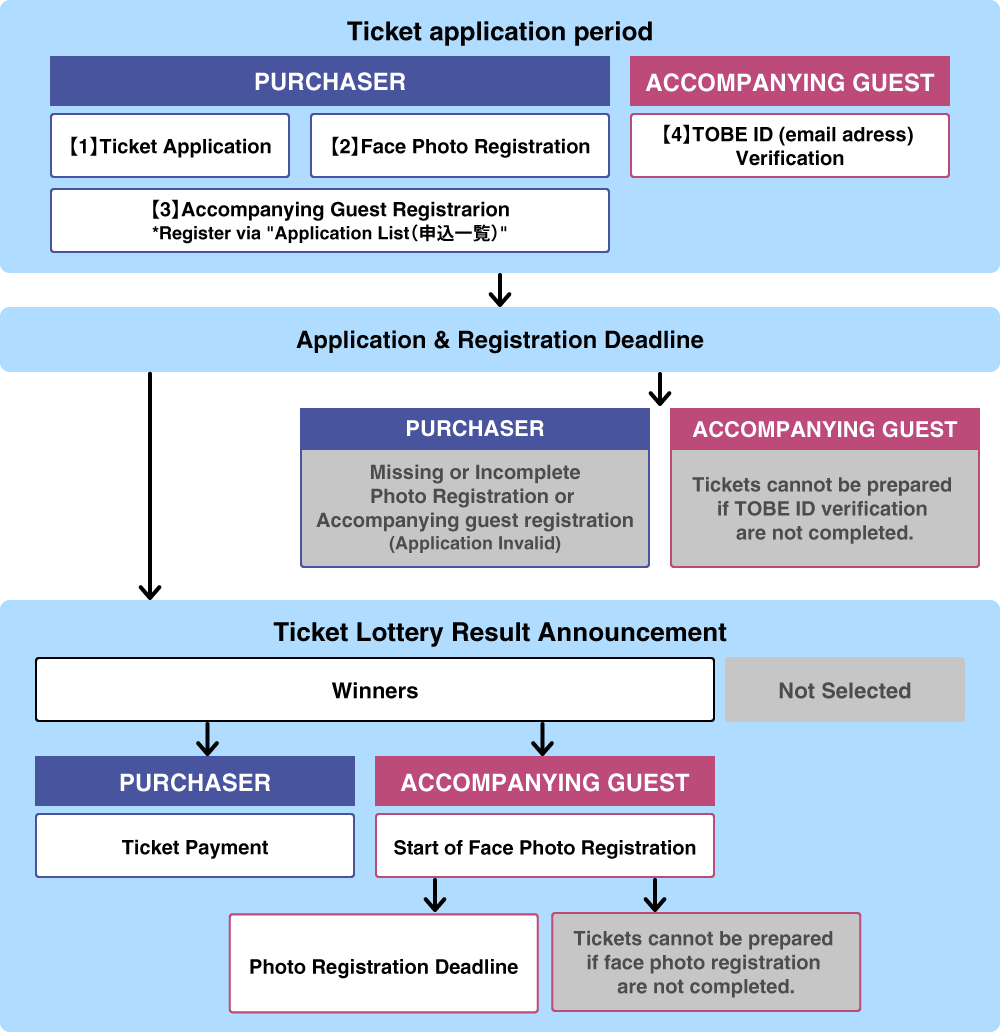
PURCHASER:Within the ticket application period, you must complete photo registration and accompanying guest registration (including TOBE ID (email address) verification by the Accompanying Guest).
ACCOMPANYING GUEST:Within the ticket application period, after the Purchaser completes the accompanying guest registration, an ‘Accompanying Guest Registration Information(同行者登録のご案内メール)’ email will be sent. The accompanying guest must complete TOBE ID (email address) verification through that email. In addition, if the Purchaser is selected, the accompanying guest must register their own face photo within the designated period, including the payment period. (Further details will be provided to successful applicants.)
Note:
- If applying for two or more tickets, all accompanying guests must also be members of the Number_i Official Fan Club.
- At the entrance to the concert both the ticket purchaser and accompanying guests will undergo facial recognition using the photos registered in advance during the designated photo registration period.
- Although it is possible to change your registered photo in your MOALA account My Page up until the date of the performance for which you were selected, PLEASE DO NOT make any changes to your photo before entering the concert on the day of the performance.
To enter, you will need a "MOALA Ticket
(display in browser)".
When linking your TOBE ID and MOALA account and registering your face photo, please complete the procedure and check using a browser.
*The MOALA Pocket app will not be used.
Please check the information displayed in your browser to confirm whether your TOBE ID and MOALA account are linked and your photo registration status.
Application process
Facial Recognition Entry for All Attendees on Event Day
Each of the Purchaser and Accompanying Guest should log in to MOALA Ticket with their MOALA account linked to their TOBE ID and confirm their tickets.
Account Linking
- Purchaser &
Accompanying Guests -
To register your photo, you must register it on the MOALA account linked to your TOBE ID.
First, please check the link status between your TOBE ID and MOALA account .
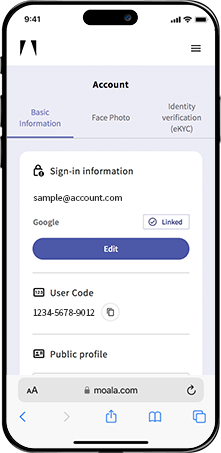
How to check from your MOALA account My Page
1.
2.
3.
4.
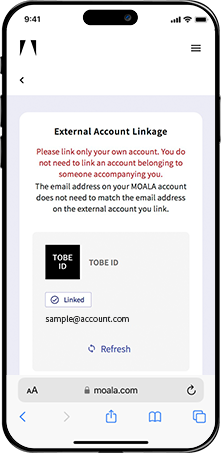
- Access your MOALA account.
- Tap the "≡" menu in the top right.
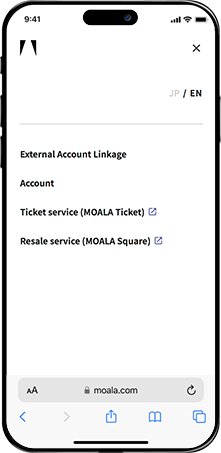
- Tap "External account linking.
- Please check if your TOBE ID is "Linked".
If it says "Linked(連携済)"
1.
2.
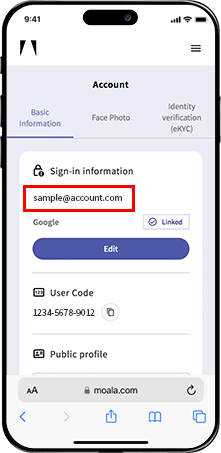
- Tap the "≡" menu in the top right and then tap "Account".
- The address listed under "Sign-in information" at the top of the Basic information section is your MOALA account.(If necessary, please take a note of the address or take a screenshot.)
If it says "Not linked(未連携)"
Please follow the steps below to link your MOALA account and TOBE ID.
1.
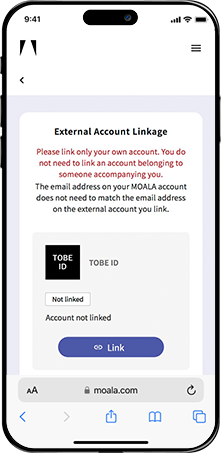
2.
3.
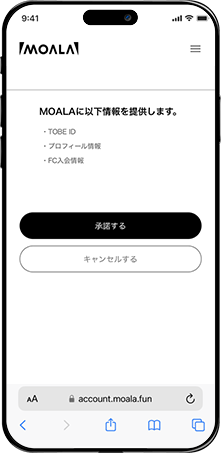
- Tap the "Connect" button.
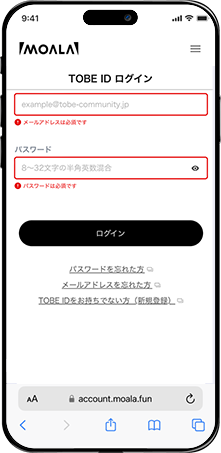
- Enter your TOBE ID and password and log in.
- Tap the "Accept(承諾する)" button.
Note:
- Once your MOALA account and TOBE ID are linked, you cannot unlink them.
- If you receive an error stating 'Already linked to another MOALA Account'(すでに他のMOALAアカウントに紐づいてます)when linking your new TOBE ID,You have another MOALA account linked to your TOBE ID.
Please log out by clicking "Logout(ログアウト)" at the bottom, then log in again with your correct MOALA account.
If you do not have a MOALA account
If you do not have a MOALA account, please register a new one following the steps below.
1.

2.
3.
4.

5.
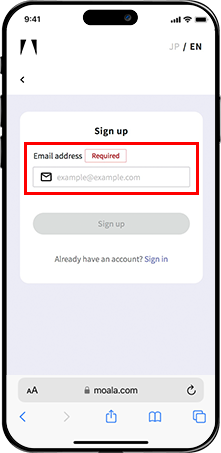
- Access the MOALA account page and tap “Sign Up.
- Enter the email address you want to use for your MOALA account, then tap “Sign Up.”
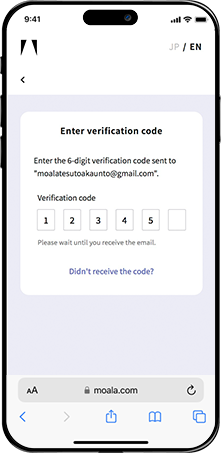
- A 6-digit verification code will be sent to the email address you entered. Check the code and enter it.
- Tap “Next.”
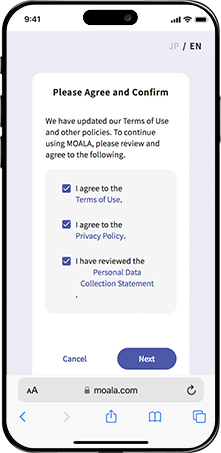
- Review the Terms of Service and Privacy Policy, check the box, and tap “Agree.”
Note:
- You do not need to register any information under “Public Profile," "Personal Information," or "My Number Card" in the MOALA account My Page.
Face photo registration:
PURCHASER
Please register your photo on your MOALA account My Pagelinked to your TOBE ID.
Note:
- PURCHASER must register a photo of themselves "during the ticket application period".
- If the PURCHASER's photo is not registered within the deadline, the application will be invalid.
- If you have already registered your photo, please check that it is correctly registered in your MOALA account linked to your TOBE ID.
Log in to your MOALA account My Page
Please log in with your MOALA account that is linked to your TOBE ID.
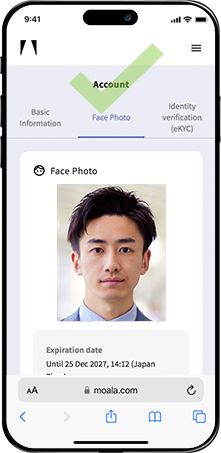
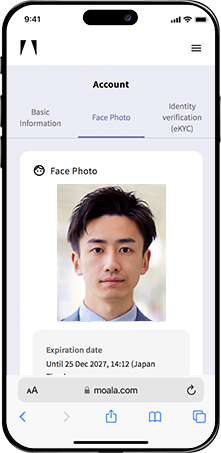
If purchaser's own face photo is not displayed in the "Face Photo" section of your MOALA Account My Page, please register your face Photo using the following steps.
1.
2.
3.
4.
5.
6.
7.
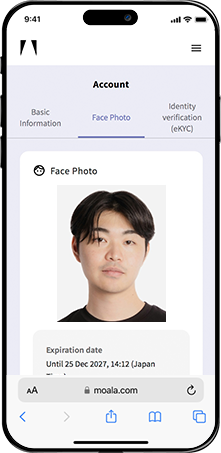
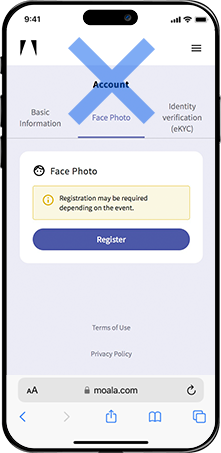
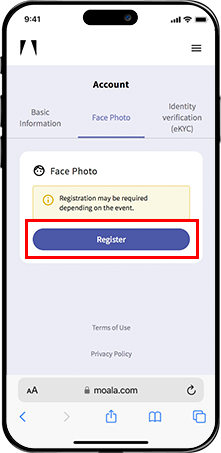
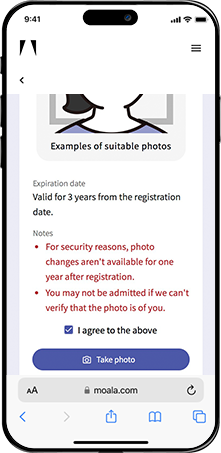
- Tap "Face Photo" on your MOALA account My Page and then tap "Regster".
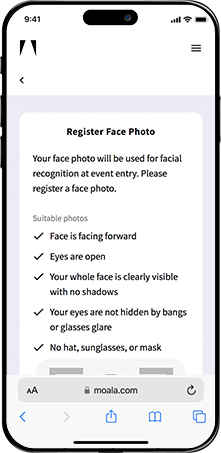
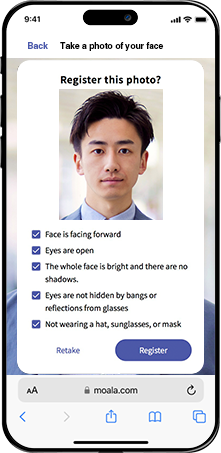
- Check the precautions when registering your face photo.
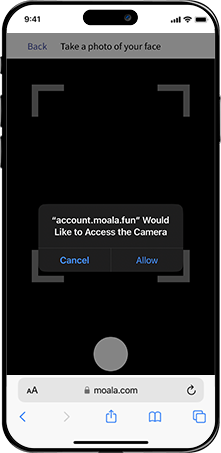
- Check the consent box and tap "Take Photo".
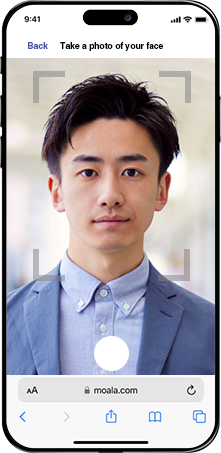
- Allow camera access.
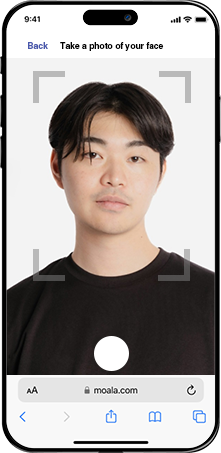
- Take a photo so that your face fits within the frame.
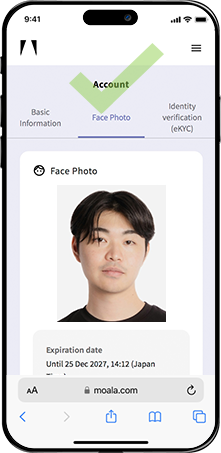
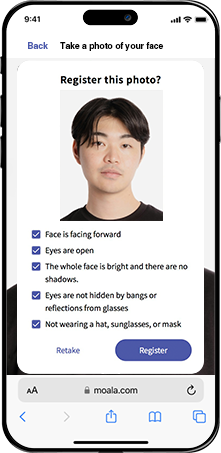
- It must be a photo of your face. If there are no problems, tap the "Register" button.
- Please check that the "Face Photo" section display your face photo.
Note:
- Once a photo has been registered, it cannot be changed for one year to prevent fraud for any reason.
- There is no need to register information in the "Public Profile," "Personal Information," or "My Number Card" sections on your MOALA account My Page.
- Even if you register your My Number card, you will not be able to enter using facial recognition.
Accompanying Guest Registration
- Purchaser -
If applying for two or more tickets, the PURCHASER must complete the following three procedures within the ticket application period.
Please note that your application will not be completed unless all procedures are finished within the designated period.
- Accompanying Guest Registration *Procedures for the Purchaser
- TOBE ID(email adress) Verification *Procedures for the Accompanying Guests
- Purchaser Confirmation of Companion Email Verification *Procedures for the Purchaser
Note:
- If applying for two or more tickets, the Purchaser must complete accompanying guest registration within the ticket application period. All accompanying guests must also be members of the Number_i Official Fan Club.
- Please complete the procedure from the ‘Application Confirmation Page(申込確認ページ)’ after finishing the application process. (The ‘Accompanying Guest Registration/Confirmation(同行者登録・確認)’ button will be displayed after the application is completed.) You will not be able to proceed once the ticket application period has passed, so please make sure to complete the procedure by the deadline.
- Please make sure to decide on all Accompanying Guests in advance before submitting your application.
- Please make sure to get the consent of your companion before entering your details.
- TOBE ID (email address) must be exactly the same as the registered information of your companion, including upper and lower case letters.
- When the Purchaser enters the accompanying guest’s TOBE ID (email address) on the accompanying guest registration screen, an ‘Accompanying Guest Registration Information(同行者登録のご案内メール)’ email will be sent to the Accompanying Guest.
- Accompanying Guest information can be corrected or changed only within the ticket application period and only before the Accompanying Guest has completed verification.
- Once verification has been completed or the ticket application period has passed, Accompanying Guest information cannot be registered, corrected, or changed under any circumstances. Please ensure that all procedures are completed correctly within the designated period.
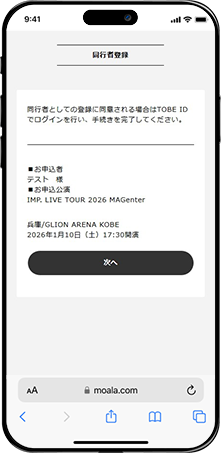
【1】Accompanying Guest Registration *Procedures for the Purchaser
1.
2.

3.
4.
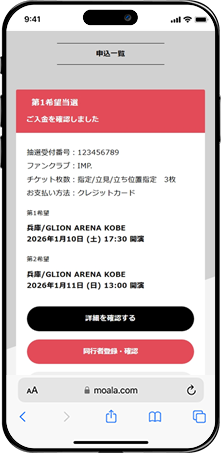
- Within the ticket application period, tap the ‘Accompanying Guest Registration/Confirmation(同行者登録・確認)’ button displayed in your application history.
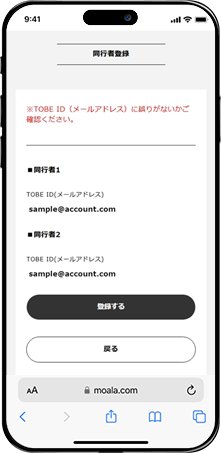
- For the number of tickets assigned to accompanying guests, enter each accompanying guest’s TOBE ID (email address) and tap ‘Next(次へ)’.
- Confirm the entered TOBE ID (email address) and tap “Register(登録する).”
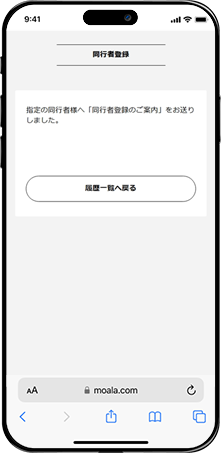
- An “Accompanying Guest Registration Guide(同行者登録のご案内)” email will be sent to the accompanying guests. Please inform them to complete the registration process themselves within the ticket application period.
Note:
- The emails mentioned above will be sent from the domain @ticket.tobe-official.jp.
Please note that you cannot resend these emails yourself, so both the purchaser and the accompanying guests should ensure that they have set their email to receive messages from the above domain in advance.
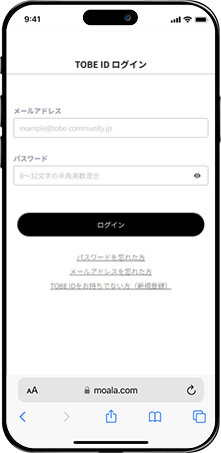
【2】TOBE ID(email adress) Verification *Procedures for the Accompanying Guests
Accompanying Guests who have been registered must complete TOBE ID (email address) verification within the ticket application period by following the steps below.
Please note that if verification has not been completed within the ticket application period, the application will not be considered complete.
1.
2.
3.
4.
- Tap the accompanying guest registration URL included in the “Accompanying Guest Registration Guide email(同行者登録のご案内メール)”.
- Confirm that the details of the event for which you are registered as an accompanying guest by the purchaser are correct, then tap “Next(次へ).”
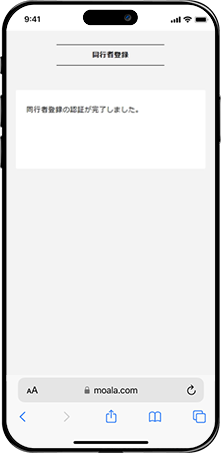
- Log in with your own TOBE ID.
- Verification is now complete on this screen. Please inform the purchaser that verification has been completed and ensure that they confirm the verification.
In case of a verification error

Please tap the companion registration URL included in the Companion Registration Guidance email (同行者登録のご案内メール) and complete the procedure again.
【3】Purchaser Confirmation of Companion Email Verification
1.
2.
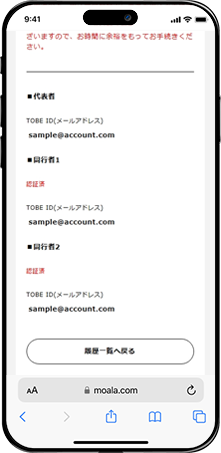
- Tap the “Accompanying Guest Registration/Confirmation(同行者登録・確認)” button displayed in your application history.
- Please check that “Verified(認証済み)” is displayed above the TOBE ID (email address) of all the accompanying guests you have registered.
Note:
- If the accompanying guest has not completed the verification procedure, “Not Verified(認証前)” will appear above their TOBE ID (email address).
Face photo registration:
Accompanying Guests
If selected, Accompanying Guests must register their own face photo within the designated period, including the payment period.
It is necessary to register a face photo from your MOALA account My Page, which is linked to your TOBE ID and entered when registering your companion.
If you have already registered your photo, please check that it is correctly registered in your MOALA account linked to your TOBE ID.
Log in to your MOALA account My Page
Please log in with the MOALA account linked to your TOBE ID that you entered when registering your companion.
For details, please see the account linking section above.
If Accompanying guests own face photo is not displayed in the "Face Photo" section of your MOALA Account My Page, please register your face Photo using the following steps.
1.
2.
3.
4.
5.
6.
7.
- Tap "Face Photo" on your MOALA account My Page and then tap "Regster".
- Check the precautions when registering your face photo.
- Check the consent box and tap "Take Photo".
- Allow camera access.
- Take a photo so that your face fits within the frame.
- It must be a photo of your face. If there are no problems, tap the "Register" button.
- Please check that the "Face Photo" section display your face photo.
- You can check the registered face photo.
Note:
- Once a photo has been registered, it cannot be changed for one year to prevent fraud for any reason.
- There is no need to register information in the "Public Profile," "Personal Information," or "My Number Card" sections on your MOALA account My Page.
- Even if you register your My Number card, you will not be able to enter using facial recognition.
- A confirmation email will not be sent for companion photo registration. Be sure to check that your registration is complete.