FACIAL RECOGNITION
ENTRY GUIDE
日本語ガイドはこちら
At concerts using mobile tickets
(face recognition),
All visitors must register Face photo to MOALA account linked to your TOBE ID.
PURCHASER:must register your photo "within the ticket application period".
ACCOMPANYING GUEST:If your group is selected, each accompanying guest must complete their own face photo registration within the designated period. Detailed instructions will be provided to the purchaser.
Note:
- At the entrance to the concert both the ticket purchaser and accompanying guests will undergo facial recognition using the photos registered in advance during the designated photo registration period.
- Although it is possible to change your registered photo in your MOALA account My Page up until the date of the performance for which you were selected, PLEASE DO NOT make any changes to your photo before entering the concert on the day of the performance.
To enter, you will need a "MOALA Ticket
(display in browser)".
When linking your TOBE ID and MOALA account and registering your face photo, please complete the procedure and check using a browser.
*The MOALA Pocket app will not be used.
Please check the information displayed in your browser to confirm whether your TOBE ID and MOALA account are linked and your photo registration status.
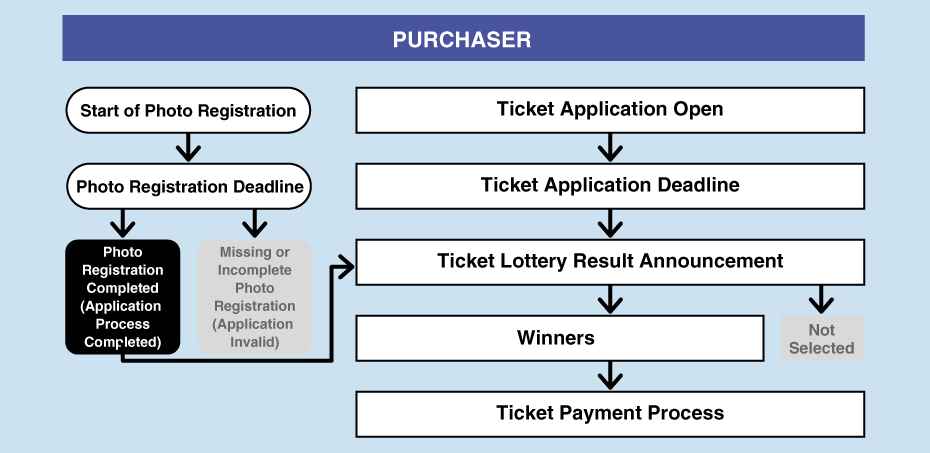
Application process
From Ticket Application to Lottery Results
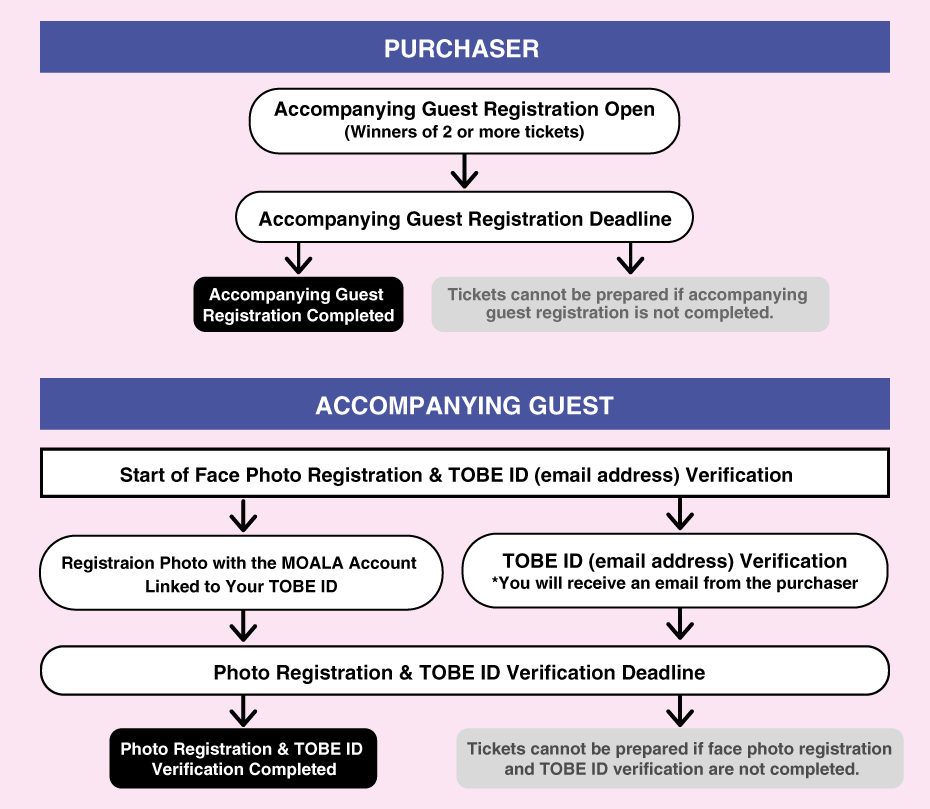
Accompanying Guest Registration
If you are selected for two or more tickets, the following procedures must be completed within the designated period.
- *Accompanying guests are required to register in advance with a TOBE ID (free of charge).
- *Detailed instructions will be provided to the purchaser.
all registration procedures correctly.
Mobile Ticket Issuance Details
Both Purchaser and accompanying guests should check their tickets log in with MOALA Account linked your TOBE ID.
*Please note that in the following cases, even if you have been selected and completed your payment, we will not be able to issue tickets for your accompanying guests, so be sure to complete the procedure correctly within the designated period.
- If there is an error in the accompanying guests information registered by the purchaser.
- If the purchaser has not completed the registration of accompanying guests during the designated period.
- If the accompanying guests have not completed TOBE ID (email address) verification during the designated period.
- Even if the accompanying guest registration has been completed, if the accompanying guest has not completed facial photo registration within the designated period.
*If the proper procedures cannot be confirmed even after being notified of an invalid ticket, a ticket for the corresponding accompanying guest cannot be provided. Please note that no refund will be issued in such cases.
Facial Recognition Entry for All Attendees on Event Day
Account Linking
- Purchaser &
Accompanying Guests -
To register your photo, you must register it on the MOALA account linked to your TOBE ID.
First, please check the link status between your TOBE ID and MOALA account .
How to check from your MOALA account My Page
1.
2.
3.
4.
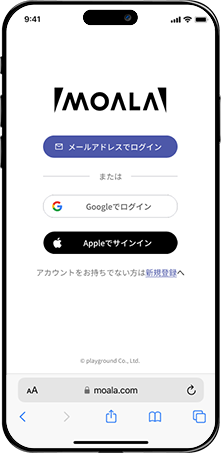
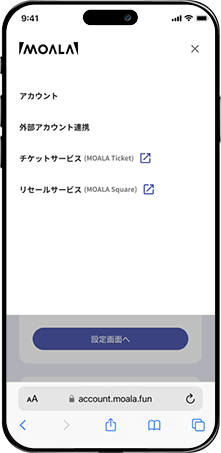
- Access your MOALA account.
- Tap the "≡" menu in the top right.
- Tap "External account linking(外部アカウント連携).
- Please check if your TOBE ID is "Linked(連携済)".
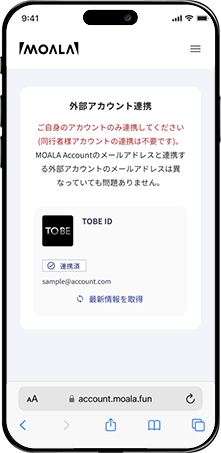
If it says "Linked(連携済)"
1.
2.
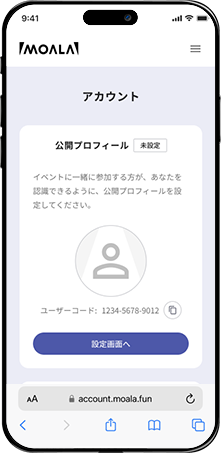
- Tap the "≡" menu in the top right and then tap "Account(アカウント)".
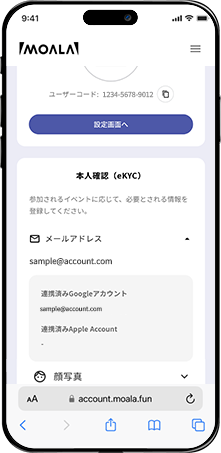
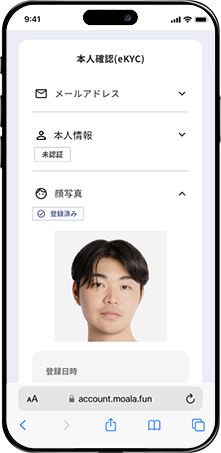
- Tap "Email address(メールアドレス)" under identity verification (eKYC).The address listed here is your MOALA account.(If necessary, please take a note of the address or take a screenshot.)
If it says "Not linked(未連携)"
Please follow the steps below to link your MOALA account and TOBE ID.
1.

2.
3.
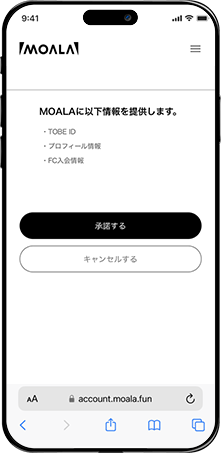
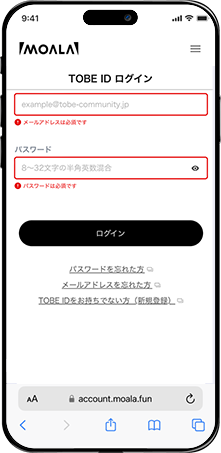
- Tap the "Connect(連携)" button.
- Enter your TOBE ID and password and log in.
- Tap the "Accept(承諾する)" button.
Note:
- Once your MOALA account and TOBE ID are linked, you cannot unlink them.
- If you receive an error stating 'Already linked to another MOALA Account'(すでに他のMOALAアカウントに紐づいてます)when linking your new TOBE ID,You have another MOALA account linked to your TOBE ID.
Please log out by clicking "Logout(ログアウト)" at the bottom, then log in again with your correct MOALA account.
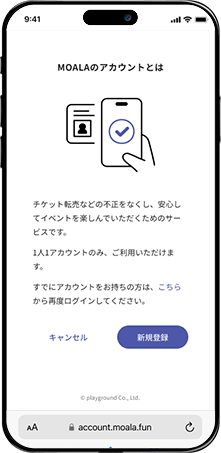
If you do not have a MOALA account
If you do not have a MOALA account, please register a new one following the steps below.
1.

2.
3.

4.
5.
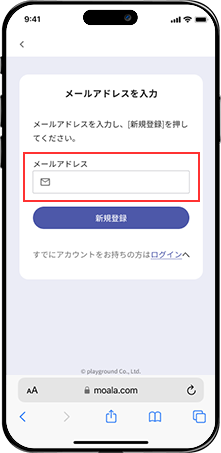
- Access the MOALA account page and tap “Sign Up(新規登録).
- Enter the email address you want to use for your MOALA account, then tap “Sign Up(新規登録).”
- A 6-digit verification code will be sent to the email address you entered. Check the code and enter it.
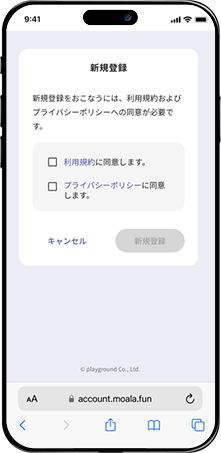
- Tap “Next(次へ).”
- Review the Terms of Service and Privacy Policy, check the box, and tap “Agree(同意する).”
Note:
- You do not need to register any information under “Public Profile(公開プロフィール)," "Personal Information(本人情報)," or "My Number Card(マイナンバーカード)" in the MOALA account My Page.
Face photo registration:
PURCHASER
Please register your photo on your MOALA account My Pagelinked to your TOBE ID.
Note:
- PURCHASER must register a photo of themselves "during the ticket application period".
- If the PURCHASER's photo is not registered within the deadline, the application will be invalid.
- If you have already registered your photo, please check that it is correctly registered in your MOALA account linked to your TOBE ID.
Log in to your MOALA account My Page
Please log in with your MOALA account that is linked to your TOBE ID.
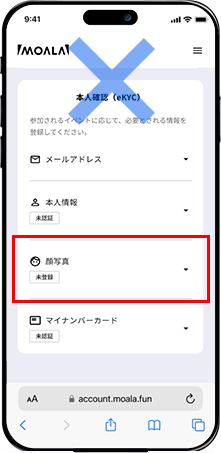
If your face photo is [Not registered(未登録)], please register your face photo by following the steps below.
1.

2.

3.

4.
5.
6.
7.

8.
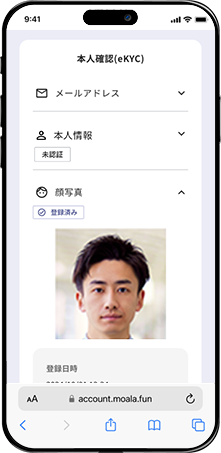
- Tap "Photo(顔写真)" on your MOALA account My Page and then tap "Go to registration screen(登録画面へ)".
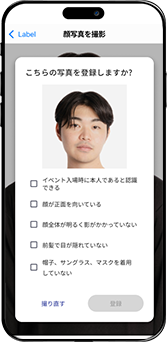
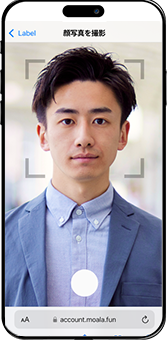
- Check the precautions when registering your face photo.
- Check the consent box and tap "Take Photo(撮影)".
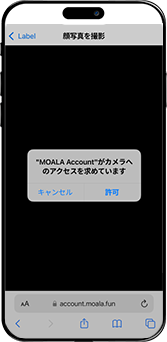
- Allow camera access.
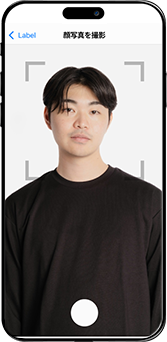
- Take a photo so that your face fits within the frame.
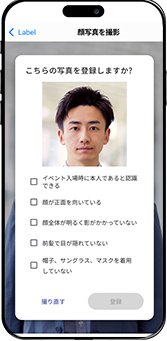
- It must be a photo of your face. If there are no problems, tap the "Register(登録)" button.
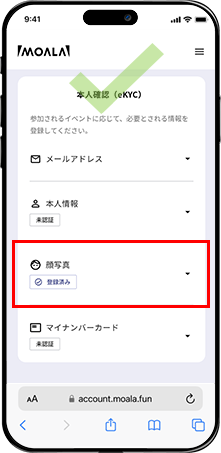
- Please check that the "Face Photo(顔写真)" section says "Registered(登録済み)".
- You can check the registered face photo.
Note:
- Once a photo has been registered, it cannot be changed for one year to prevent fraud for any reason.
- There is no need to register information in the "Public Profile(公開プロフィール)," "Personal Information(本人情報)," or "My Number Card(マイナンバーカード)" sections on your MOALA account My Page.
- Even if you register your My Number card, you will not be able to enter using facial recognition.
Accompanying Guest Registration
- Purchaser -
If you win two or more tickets, the purchaser must complete 3 procedures listed below during the Accompanying Guest Registration Period.
If these procedures are not completed, mobile tickets will not be issued, and accompanying guests will not be able to enter the venue.
Accompanying Guest Registration Period
- Vantelin Dome Nagoya/Aichi:
March 25 (Wed) – 29 (Sun) - Daiwa House PREMIST DOME/Hokkaido:
April 15 (Wed) – 19 (Sun)
- Accompanying Guest Registration *Procedures for the Purchaser
- TOBE ID(email adress) Verification *Procedures for the Accompanying Guests
- Purchaser Confirmation of Companion Email Verification *Procedures for the Purchaser
Note:
- Once the Accompanying Guest Registration Period begins, please complete the procedure via the “Application Confirmation Page(申し込み確認ページ).”
- Please make sure to get the consent of your companion before entering your details.
- When registering accompanying guests, you cannot register anyone who has won a ticket for the same performance date (regardless of whether payment has been made) as an accompanying guests.
- When the Accompanying Guest Registration Period begins, the “Companion Registration / Confirmation(同行者登録・確認)” button will become available and the input fields will be displayed. Companion registration is not available until payment has been completed.
- If you win two or more tickets, the purchaser is required to register the companion’s TOBE ID (email address) via the “Application Confirmation(申込確認)” page on the event page during the Accompanying Guest Registration Period.
- TOBE ID (email address) must be exactly the same as the registered information of your companion, including upper and lower case letters.
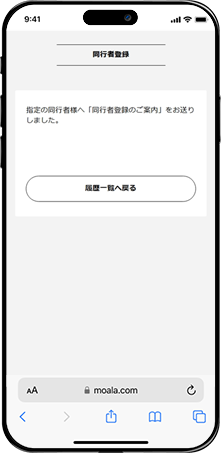
- Once the purchaser enters the accompanying guest’s TOBE ID (email address) on the companion registration page, an email titled “Accompanying Guest Registration Guide(同行者登録のご案内)” will be sent to the accompanying member.
- Corrections or changes to accompanying guest information are allowed only during the Accompanying Guest Registration Period and must be made before the guest completes TOBE ID(email adress) verification.
- Once verification is complete, or after the Accompanying Guest Registration Period ends, you cannot register, edit, or change companion information. Be sure to complete the procedure correctly within the period.
- If there are any errors in the companion information you have entered, we will not be able to prepare the mobile ticket, so please be sure to confirm the correct information with your companion in advance.
- In the following cases, even if you have been selected and have already paid, we will not be able to send tickets to your accompanying guests, so please be sure to complete the correct procedure during the period.
- - If there is an error in the accompanying guests information registered by the purchaser.
- - If the purchaser has not completed the registration of accompanying guests during the Accompanying Guest Registration Period.
- - If the accompnying guest has not verified their TOBE ID (email address) during the Accompanying Guest Registration Period.
- - Even if the accompanying guest registration has been completed, if the accompanying guest has not completed facial photo registration within the designated period.
【1】Accompanying Guest Registration *Procedures for the Purchaser
1.
2.

3.
4.
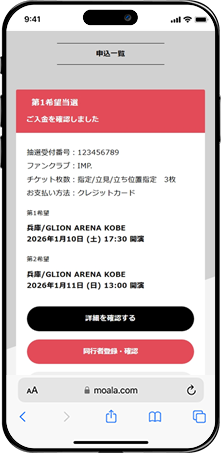
- During the Accompanying Guest Registration Period, tap the “Companion Registration / Confirmation(同行者登録・確認)” button displayed in your application history.
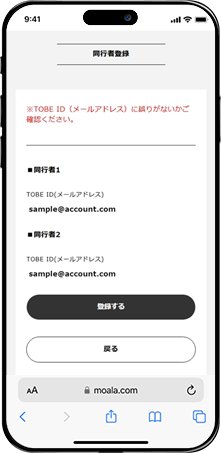
- Enter the TOBE ID (email address) for each accompanying guest’s ticket and tap “Next(次へ).”
- Confirm the entered TOBE ID (email address) and tap “Register(登録する).”
- An “Accompanying Guest Registration Guide(同行者登録のご案内)” email will be sent to the accompanying guests. Please inform them to complete the registration process themselves within the application period.
Note:
- The emails mentioned above will be sent from the domain @ticket.tobe-official.jp.
Please note that you cannot resend these emails yourself, so both the purchaser and the accompanying guests should ensure that they have set their email to receive messages from the above domain in advance.
【2】TOBE ID(email adress) Verification *Procedures for the Accompanying Guests
Accompanying guests registered by the purchaser must complete TOBE ID (email address) verification by following the steps below during the Accompanying Guest Registration Period. This verification must be completed.
Please note that if companions do not complete verification within the Accompanying Guest Registration Period, mobile tickets for the companions cannot be issued.
1.
2.
3.
4.
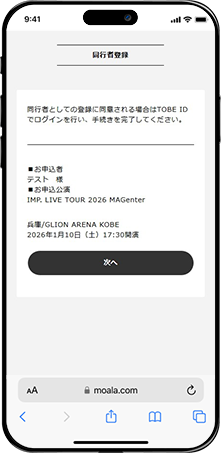
- Tap the accompanying guest registration URL included in the “Accompanying Guest Registration Guide email(同行者登録のご案内メール)”.
- Confirm that the details of the event for which you are registered as an accompanying guest by the purchaser are correct, then tap “Next(次へ).”
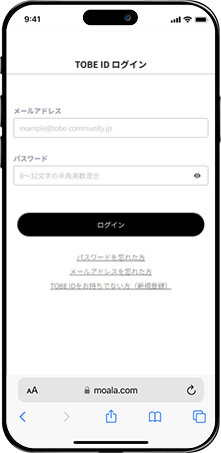
- Log in with your own TOBE ID.
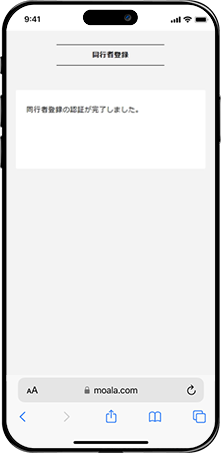
- Verification is now complete on this screen. Please inform the purchaser that verification has been completed and ensure that they confirm the verification.
In case of a verification error

Please tap the companion registration URL included in the Companion Registration Guidance email (同行者登録のご案内メール) and complete the procedure again.
【3】Purchaser Confirmation of Companion Email Verification
1.
2.
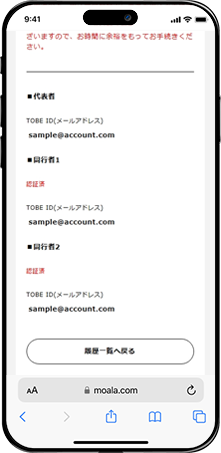
- Tap the “Accompanying Guest Registration/Confirmation(同行者登録・確認)” button displayed in your application history.
- Please check that “Verified(認証済み)” is displayed above the TOBE ID (email address) of all the accompanying guests you have registered.
Note:
- If the accompanying guest has not completed the verification procedure, “Not Verified(認証前)” will appear above their TOBE ID (email address).
Face photo registration:
Accompanying Guests
Accompanying Guests are required to register their own photo during the Accompanying Guest Registration Period.
Photo Registration Period for Accompanying Guests
- Vantelin Dome Nagoya/Aichi:
by March 29 (Sun) 23:59 JST - Daiwa House PREMIST DOME/Hokkaido:
by April 19 (Sun) 23:59 JST
It is necessary to register a face photo from your MOALA account My Page, which is linked to your TOBE ID and entered when registering your companion.
If you have already registered your photo, please check that it is correctly registered in your MOALA account linked to your TOBE ID.
Log in to your MOALA account My Page
Please log in with the MOALA account linked to your TOBE ID that you entered when registering your companion.
For details, please see the account linking section above.
If your face photo is [Not registered(未登録)], please register your face photo by following the steps below.
1.
2.
3.
4.
5.
6.
7.
8.
- Tap "Photo(顔写真)" on your MOALA account My Page and then tap "Go to registration screen(登録画面へ)"
- Check the precautions when registering your face photo.
- Check the consent box and tap "Take Photo(撮影)".
- Allow camera access.
- Take a photo so that your face fits within the frame.
- It must be a photo of your face. If there are no problems, tap the "Register(登録)" button.
- Please check that the "Face Photo(顔写真)" section says "Registered(登録済み)"
- You can check the registered face photo.
Note:
- Once a photo has been registered, it cannot be changed for one year to prevent fraud for any reason.
- There is no need to register information in the "Public Profile(公開プロフィール)," "Personal Information(本人情報)," or "My Number Card(マイナンバーカード)" sections on your MOALA account My Page.
- Even if you register your My Number card, you will not be able to enter using facial recognition.
- A confirmation email will not be sent for companion photo registration. Be sure to check that your registration is complete.
Mobile Ticket Display
How to Display the Mobile Ticket
1.

2.
3.
4.
5.
6.
- Please access MOALA Ticket using one of the recommended browsers, then tap "Sign Up(新規登録) / Log In(ログイン)".
- iPhone:Safari(latest version)
- Android:Chrome(latest version)
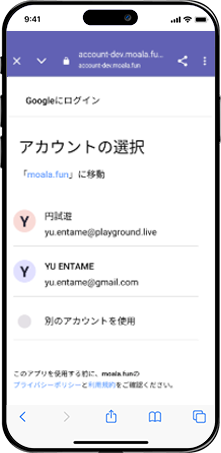
- Log in with your MOALA account linked to your TOBE ID.
- If you're prompted to select an account, choose the MOALA account associated with your TOBE ID.
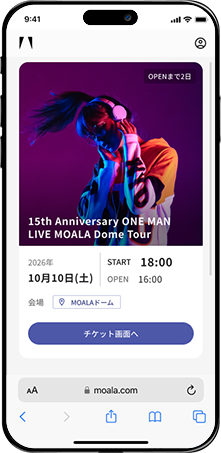
- Please confirm your ticket for the relevant event, then tap the 'Go to Ticket Screen(チケット画面へ)' button.
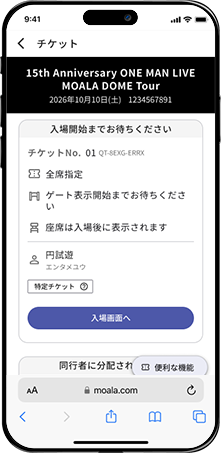
- Tap the 'Proceed to Entry Screen(入場画面へ)' button.
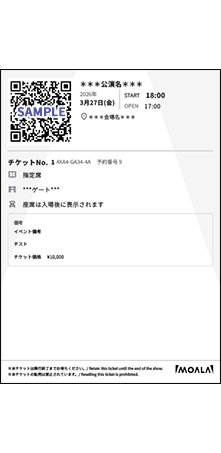
- The displayed QR code is required for entry.
Note:
- The URL is the same for all users. If you have not received the ticket issuance email, please access your ticket from this link.
- Screenshots cannot be used for entry. However, please take a screenshot of your QR code as a backup in case of network issues.
If you are unable to see your ticket after logging in
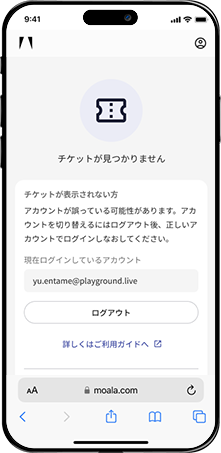
Note:
- Tickets for the relevant event are not yet available for viewing.
Please wait until you receive the notification that ticket issuance has started. - If you are logged in with the wrong MOALA account.
Please log out once and then log in again with the correct MOALA account.
For Attendees Under 18 Years Old (Up to High School) Who Do Not Have a Smartphone
It is possible to switch between MOALA accounts on a single smartphone to display tickets. However, attendees under 18 years old (up to high school) can enter using a printed ticket with the QR code by following the steps below.
1.
2.
3.
4.
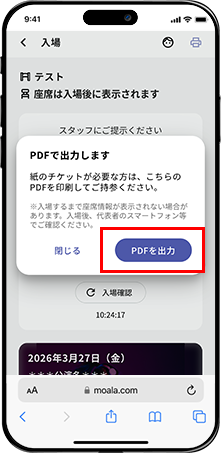
Please follow the steps above to access the accompanying guest’s MOALA Ticket and display the mobile ticket (QR code screen).
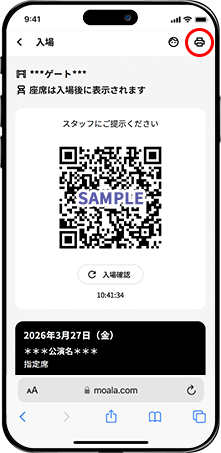
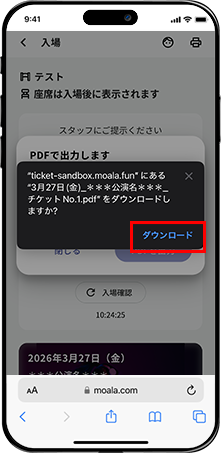
- Tap the printer icon at the top right.
- Tap “Export as PDF(PDFを出力).”
- Tap “Download(ダウンロード).”
- Print the downloaded PDF and bring it with you on the day of the event.
Note:
- For entry, use the same entry gate as for regular tickets.
- Your accompanying guest’s seat number can be checked after facial recognition via the “Accompanying Guest Ticket” section of the purchaser’s ticket, or by accessing MOALA Ticket with the accompany’s MOALA account
Regarding Entry
1.
2.
3.
4.
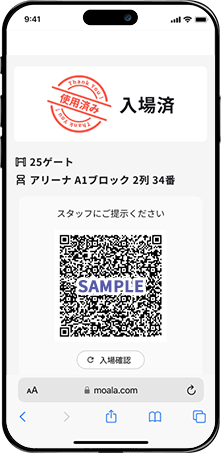
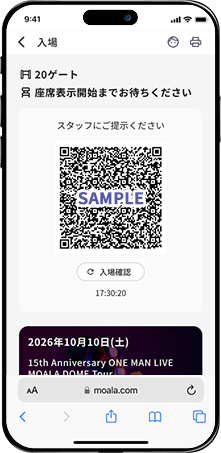
- Display the entry screen (QR code) from the MOALA Ticket. *To check how to display it, please refer to "Mobile Ticket Display".
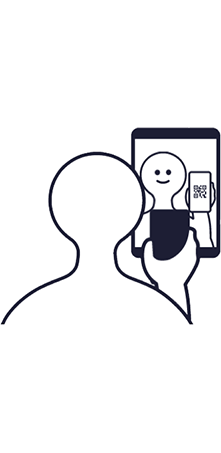
- Please align your face and the QR code together on the facial recognition tablet screen.
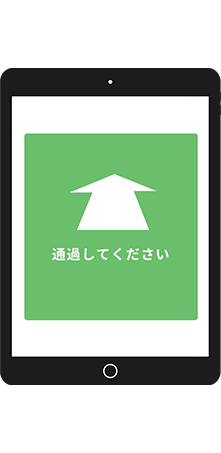
- Once facial recognition is complete, the tablet screen will display the message "Please Proceed(通過してください)."
- Once facial recognition is complete, the ticket status will change to "Entered(入場済)," and your seat information will be displayed. If the information does not appear, please try refreshing the page or check your internet connection.
Note
- ・When showing your face to the tablet, please remove hats, sunglasses, masks, and similar items.
- ・At the entrance to the concert both the ticket purchaser and accompanying guests will undergo facial recognition using the photos registered in advance during the designated photo registration period.
- ・Although it is possible to change your registered photo in your MOALA account My Page up until the date of the performance for which you were selected, PLEASE DO NOT make any changes to your photo before entering the concert on the day of the performance.
- ・If you change your registered photo, facial recognition at the time of entry may fail, and you may be asked to verify your identity. Please be aware that this could delay your entry and may prevent you from entering before the performance begins.
Identity Verification
- *On the day of the performance, identity verification may be conducted using a photo ID in addition to facial recognition.
- *All attendees—the purchaser and accompanying guests—must bring a government-issued photo ID.
- *IDs without a photo are not accepted under any circumstances.
Note:
- Guests who do not have a government-issued photo ID must bring two or more specified IDs.
- Presenting two or more IDs without a photo is only allowed for attendees under 18 years old (up to high school students).
- Please check the list of acceptable photo IDs below. IDs other than those specified will not be accepted.
Note:
- Traditional health insurance cards will no longer be valid after December 1, 2025.
Attendees under 18 years old (up to high school students) planning to use a health insurance card must present a Certificate of Eligibility after December 2, 2025.
Resale
If you have already applied through resale, please do not apply for the same performance (date and time) through the additional seat(開放席) release.
Please click here to see how to purchase via resale.
*Guests who purchased tickets through resale will also enter using facial recognition.
Preparing for resale listing
1.
2.
3.
4.
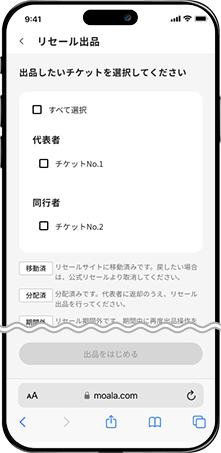
5.
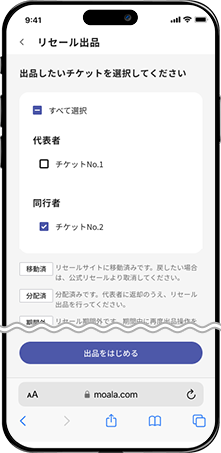
6.
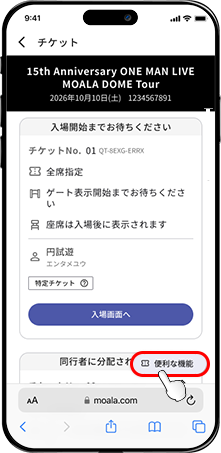
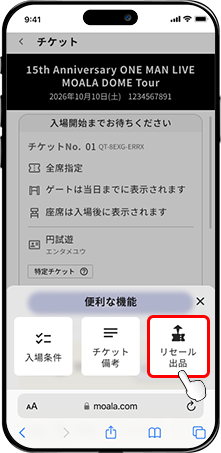
- During the resale period, tap "Useful Features(便利な機能)" on the ticket details screen of the event you wish to list.
- Tap "Resale Listing(リセール出品)".
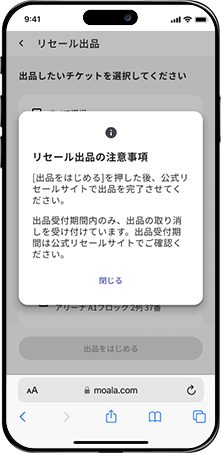
- Please be sure to read the important notes for resale listing, then tap "Close(閉じる)."
- Select the ticket you wish to list.
- After selecting, tap "Start Listing(出品をはじめる)."
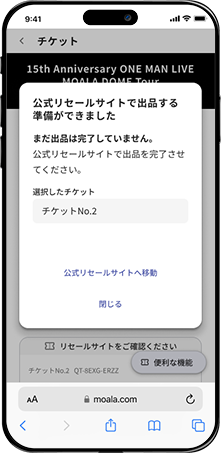
- The ticket has been moved to the official resale site. Please note that the listing has not yet been completed.
Please access the official resale site (MOALA Square) and complete the listing process.
For details on how to list your ticket, please check the "Listing Application(出品申込)" section here.
Note:
- Only the purchaser can list tickets for resale. Tickets for accompanying guests also need to be listed by the purchaser.
- To list a companion's ticket for resale, the ticket needs to be returned to the purchaser by the companion. Please tap "Return to Purchaser(代表者へ返却)" on the ticket you wish to list and complete the return process. Once the return is complete, the purchaser can list the ticket for resale.